Food for Angels and Devils
Höllisch scharf oder himmlisch süß: Eine kulinarische Verführung
Tagged with croissants
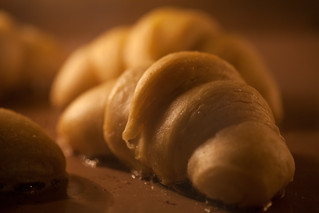
Croissants
 Wusstet ihr, dass das Croissant ursprünglich nicht aus Frankreich sondern Österreich stammte? Das wusste ich bis zu dem Croissant Kurs neulich auch nicht. Irgendwie kam das Croissant dann von Österreich nach Frankreich, wo man es heute nicht mehr missen will.
Bis jetzt habe ich sie auf dem Markt in Lörrach gekauft. Da hat es einen kleinen Stand aus dem Elsass, wo es richtig gute Croissants hat. Die schmecken richtig gut mit etwas Butter und Honig oder einer guten Marmelade.
Seit dem Kurs im Mühlerama kann ich sie nun auch selber herstellen. Tourieren ist nicht so schlimm, wie es auf den ersten Blick erscheint. Man braucht für das perfekte Croissant einfach nur Zeit, viel Zeit, ganz viel Zeit. So mal schnell nebenbei geht das nicht. Wichtig bei Croissants ist auch, dass ihr ganz genau arbeitet. Der Zeitplan ist so ausgelegt, dass ihr am Sonntag zum Frühstück lauwarme Croissants habt.
Freitag so gegen 20 Uhr
1 g frische Hefe
Alles gut in einer Schüssel oder im Weckglas vermengen. Zudecken und für 12 Stunden bei Raumtemperatur reifen lassen.
Samstag um 8 Uhr
135 g kalte Milch
14 g frische Hefe
Alle Zutaten bis auf das Salz auf der ersten Stufe der Küchenmaschine für 4 Minuten kneten. Salz hinzugeben und auf der zweiten Stufe für 6 Minuten den Teig fertig kneten. Den Teig leicht rechteckig formen, mit Klarsichtfolie gut einpacken und für min 1 Stunden in den Kühlschrank geben.
Während der Teig ruht wird die Butterplatte hergestellt. Das Mehl verhindert, dass die Butter während des Tourieren schmiert.
Beides gut verkneten (die Küchenmaschine übernimmt gerne diese Aufgabe). Nun die Masse zwischen Backpapier zu einer 5-7 mm dicken rechteckigen Platte ausrollen. Wichtig ist, dass die Platte gleichmässig ausgerollt ist. Im Kühlschrank kühl stellen.
Nun den Teig knapp doppelt so gross wie die Butterplatte ausrollen. Die Butterplatte auf die eine Hälfte legen und mit der anderen Hälfte bedecken. Die Ränder andrücken. Nun den Teig gleichmässig auf eine Länge von 50 cm und Breite von 20 cm ausrollen. Die erste einfache Tour falten. Den Teig in Klarsichtfolie einpacken und für 2-3 Stunden in den Kühlschrank geben.
Den Teig mit der geschlossenen Seite nach links vor sich legen. Wieder wie beim ersten Mal ausrollen und eine einfache Tour falten. Nun geht es wieder gut eingepackt für 2-3 Stunden in den Kühlschrank. Das ganze wird noch einmal wiederholt.
Der Teig wird nun gleichmässig 5 mm dick ausgerollt (ca 70 cm lang und 24 cm breit). Mit einem schrafen Messer Dreiecke schneiden. Am besten schneidet man eins und nimmt es als Vorlage für die restlichen. Die Dreiecke für 20 Minuten im Kühlschrank ruhen lassen.
Am oberen Ende des Dreieckes ein kleines Stück einschneiden und auseinander ziehen. Nun ohne Druck aufrollen und mit dem Zipfel nach unten auf ein mit Backpapier belegtes Blech legen.
Die Croissants gut abedecken und über Nacht im Kühlschrank aufgehen lassen.
Am Sonntagmorgen den Ofen auf 220°C vorheizen. Die Croissants aus dem Kühlschrank nehmen. 1 Ei mit einer Prise Salz und Zucker verquirlen und die Croissant zweimal damit bestreichen.
Die Croisstants für 20-25 Minuten backen. Dabei die Temperatur nach ca 10 Minuten auf 180°C reduzieren.
Nun die Croissants leicht auskühlen lassen und reinbeisen. Ihr werdet nun vermutlich, wie ich, ganz stolz sein und nie wieder (oder nur noch ganz selten) Croissants kaufen.
Croissant zutaten
- LET'S CONNECT!
Cruffins – Croissant meets Muffin
- 47.4K Shares
- 553
- 6
- 0
- 5
- 46.7K
- 109
Yes – not only a donut can fall in love with a croissant – muffins can do that too – in some way ;)
These cruffins are a mix of a flaky fluffy croissant and a muffin – the muffin is basically the shape ;) Forget cronuts – they are fatty fat fat – these cruffins are healthier I would say. They have quite some butter inside to get the fluffy texture – but unlike the cronuts they are not fried. Healthy! Or slightly healthier ;)
 Cruffins – Croissant meets Muffin | Bake to the roots
Anyways – these cruffins are awesome. Fluffy, airy and cross – when you tear them apart you can see all the layers of the paper thin dough – almost like puff pastry, but not exactly like that… The dough is basically an easy yeast dough – not too complicated to make. The trick to get all these thin layers is….. a noodle machine! :)
There is no need to make a classic puff pastry dough (which many are afraid to do themselves at home – for no reason?!). The effect of the thin layers is done with the help of the noodle machine that rolls out the dough to a paper thin layer which is then buttered and rolled up again to get the butter-dough-butter-dough layers – easy as that. Well ok, not that easy, but if you have a noodle machine at home you probably made noodles yourself already and have some experience. I would not buy a noodle machine only for this cruffins (even though they are awesome!) ;) But if you want to buy one – take a look here (Link to Amazon Germany) ;) Maybe you have a Kitchen Aid and the noodle extra thingy – that is also cool :)


I was also thinking about filling them with some vanilla custard and top them with some buttercream or similar – but then they would need a new name: The Crofucake. Croissant + F***ing (Awesome) + Cupcake. Maybe I should think about that :P
Note: I am not the inventor of this bake or name (that credit goes to a bakery in SF rumors say) – so the ones who want to go crazy can calm down again ;)
If you like to make Cruffins without a pasta maker, you can take a look at this recipe here: Cruffins with Prunes – don’t worry, you don’t have to fill them with prunes, if you don’t like ;) Use cinnamon sugar or chocolate. Works well!
 Cruffins with Prunes | Bake to the roots
INGREDIENTS / ZUTATEN
1 1/4 cups (160g) bread flour
1 1/8 cups (140g) all-purpose flour
2 tsp. (7g) dry yeast
1/2 cup (120ml) lukewarm water + up to 1/5 cup (50ml) for adjustment
1/4 cup (50g) butter, at room temperature
3/4 cup (165g) butter, at room temperature
confectioner’s sugar for dusting
160g Weizenmehl (Type 1050)
140g Mehl (Type 405)
1 Pkg. (7g) Trockenhefe
120ml lauwarmes Wasser + bis zu 50ml (falls notwendig)
50g weiche Butter
165g weiche Butter
Puderzucker zum Bestäuben


DIRECTIONS / ZUBEREITUNG
2. In a large bowl mix flours, dry yeast, salt and sugar until well combined. Add the lukewarm water and knead on low speed for about 2-3 minutes. The dough is a bit tough – if it is not coming together well, add some more water – up to 1/5 cup (50ml). Add the 1/4 cup (50g) of butter and knead on low speed for about 5 minutes. Increase the speed to medium and knead for another 15-20 minutes. You should get a very smooth and elastic dough. Cover with a kitchen towel or plastic wrap and let rise for 40-45 minutes at room temperature. The dough should expand slightly.
3. Cut the dough into four equal pieces. While you are working with one piece of dough, cover the rest and set aside. Press the dough in a rectangular shape (should have the width of the pasta machine). With a pasta machine at its thickest increment, feed the dough through the machine. Continue rolling out the dough with the machine until you reach the thinnest increment. You can do that by re-feeding the pasta machine everytime or you connect the ends and make a ring (that is a bit easier). Don’t forget to slightly dust the dough from time to time so it won’t stick to the machine. Avoid any crinkling or folding of the dough during this process, laying it neat and flat on the counter (yes you need some space). Cut the dough strip in half and lay both flat on the counter.
4. Add 1/4 of the remaining butter – about 1.4 oz. (40g) – on top of the two dough strips and spread evenly all over the dough all the way to the edges. Use a spatula or your fingers (works best, even though it’s a bit messy). Once finished, start rolling the dough from one end to the other, as tight as possible, into a firm roll. Place that roll on one end of the second buttered dough strip and continue rolling. When done, cut the roll in half lengthwise with a sharp knife. With the cut side facing outward, twirl the half dough roll into a kind of knot and tuck the ends unterneath – they should not be too tight, so the can still expand a bit. Place in a greased muffin tin. Do the same with the other half of the roll and repeat the whole process with the remaining dough. Cover loosely with plastic wrap and let rise for about 45-90 minutes (depends on how fast the yeast works) at room temperature until doubled in size. You can also do the hard work a day in advance and let the cruffins rise over night in the fridge.
5. Preheat the oven to 390˚F (200°C). Bake the cruffins for 25 minutes until golden brown. Let cool slightly on a wire rack, then dust with confectioner’s sugar.
2. In einer großen Schüssel das Mehl, Trockenhefe, Salz und Zucker gut vermischen. Lauwarmes Wasser zugeben und alles auf niedriger Stufe etwa 2-3 Minuten verkneten. Der Teig ist ziemlich fest, es kann aber sein, dass sich nicht alles verbindet – dann einfach nach und nach etwas Wasser zugeben (bis max. 50ml). Die 50g Butter zugeben und auf niedriger Stufe für etwa 5 Minuten verkneten. Geschwindigkeit etwas erhöhen und für weitere 15-20 Minuten kneten lassen. Es sollte ein sehr glatter und elastischer Teig entstehen. Mit einem Küchentuch oder Plastikfolie abdecken und für 40-45 Minuten bei Zimmertemperatur gehen lassen. Der Teig sollte sich etwas vergrößert haben.
3. Den Teig in vier gleichgroße Stücke teilen. Während man an einem Stück Teig arbeitet, sollte der Rest mit Plastikfolie abgedeckt sein, damit er nicht austrocknet. Das Teigstück zu einem Rechteck formen, das in etwa die Breite der Nudelmaschine hat. Mit der Rollenstellung anfangen, die den größten Abstand hat und den Teig durchrollen. Wie beim Nudelteig immer kleiner stellen, bis zum kleinsten Abstand. Man kann das machen, indem man den Teig immer wieder neu einfädelt, oder man bringt Anfang und Ende zusammen und rollt dann einen Ring (ist etwas einfacher). Nicht vergessen zwischendurch den Teig mit Mehl einzustäuben, damit er nicht an der Nudelmaschine kleben bleibt. Wenn es geht auch Falten im Teig vermeiden – den Teig sauber und flach auf einer bemehlten Fläche ablegen (ja, man braucht etwas Platz dafür). Den Teigstreifen halbieren und beide Streifen nebeneinander legen.
4. Etwa 1/4 der Butter (40g) gleichmäßig auf den Teigstreifen verteilen – bis zu den Rändern. Man kann eine Teigkarte/Spatel verwenden oder einfach die Finger (funktioniert am Besten, auch wenn’s ne kleine Sauerei gibt). Sobald die Butter verteilt ist, einen der Streifen (möglichst fest) aufrollen. Diese Rolle dann auf ein Ende des zweiten Streifens legen und weiter aufrollen. Die entstandene Rolle dann mit einem scharfen Messer längs durchschneiden und aus jeder der Hälften einen “Knoten” formen – die Schnittkante sollte dabei nach Außen zeigen und die Enden sollten nach unten eingeschlagen werden. Sie sollten nicht zu fest gerollt sein, damit sie noch etwas aufgehen können. Die Knoten in ein gefettetes Muffinblech legen und mit dem restlichen Teig ebenso verfahren. Wenn alle Cruffins im Muffinblech sind, locker mit Klarsichtfolie einschlagen und für 45-90 Minuten (je nachdem wie schnell die Hefe arbeitet) bei Zimmertemperatur gehen lassen, bis sich das Volumen in etwa verdoppelt hat. Man kann die ganze Arbeit auch am Vortag machen und die Cruffins dann im Kühlschrank über Nacht gehen lassen.
5. Den Ofen auf 200°C (390°F) vorheizen. Die Cruffins für etwa 25 Minuten backen, bis sie goldbraun sind. Auf einem Kuchengitter leicht abkühlen lassen und dann mit Puderzucker bestäuben.
Craving more? Keep in touch on Facebook, Twitter, Instagram and Pinterest for new post updates and more. You can also contact me with any questions or inquiries!
Here is a version of the recipe you can print easily.

- 1 1/4 cups (160g) bread flour
- 1 1/8 cups (140g) all-purpose flour
- 2 tsp. (7g) dry yeast
- 1/2 tsp. salt
- 2 tbsp. sugar
- 1/2 cup (120ml) lukewarm water + up to 1/5 cup (50ml) for adjustment
- 1/4 cup (50g) butter, at room temperature
- 3/4 cup (165g) butter, at room temperature
- confectioner's sugar for dusting
- 7 oz. (200g) heavy cream, whipped (optional)
- Before you start making the dough, you should take the butter out of the fridge and leave it somehere to get to room temperature - for at least two hours - I do that normally over night.
- In a large bowl mix flours, dry yeast, salt and sugar until well combined. Add the lukewarm water and knead on low speed for about 2-3 minutes. The dough is a bit tough - if it is not coming together well, add some more water - up to 1/5 cup (50ml). Add the 1/4 cup (50g) of butter and knead on low speed for about 5 minutes. Increase the speed to medium and knead for another 15-20 minutes. You should get a very smooth and elastic dough. Cover with a kitchen towel or plastic wrap and let rise for 40-45 minutes at room temperature. The dough should expand slightly.
- Cut the dough into four equal pieces. While you are working with one piece of dough, cover the rest and set aside. Press the dough in a rectangular shape (should have the width of the pasta machine). With a pasta machine at its thickest increment, feed the dough through the machine. Continue rolling out the dough with the machine until you reach the thinnest increment. You can do that by re-feeding the pasta machine everytime or you connect the ends and make a ring (that is a bit easier). Don't forget to slightly dust the dough from time to time so it won't stick to the machine. Avoid any crinkling or folding of the dough during this process, laying it neat and flat on the counter (yes you need some space). Cut the dough strip in half and lay both flat on the counter.
- Add 1/4 of the remaining butter - about 1.4 oz. (40g) - on top of the two dough strips and spread evenly all over the dough all the way to the edges. Use a spatula or your fingers (works best, even though it's a bit messy). Once finished, start rolling the dough from one end to the other, as tight as possible, into a firm roll. Place that roll on one end of the second buttered dough strip and continue rolling. When done, cut the roll in half lengthwise with a sharp knife. With the cut side facing outward, twirl the half dough roll into a kind of knot and tuck the ends unterneath - they should not be too tight, so the can still expand a bit. Place in a greased muffin tin. Do the same with the other half of the roll and repeat the whole process with the remaining dough. Cover loosely with plastic wrap and let rise for about 45-90 minutes (depends on how fast the yeast works) at room temperature until doubled in size. You can also do the hard work a day in advance and let the cruffins rise over night in the fridge.
- Preheat the oven to 390˚F (200°C). Bake the cruffins for 25 minutes until golden brown. Let cool slightly on a wire rack, then dust with confectioner's sugar.
- Enjoy baking!
Suggested Posts


31 comments
Absoluter Hammer! Die erinnern mich soooo an Sfogliatelle. Der Teig wird auch mit einer Nudelmaschine ausgerollt und gefüllt werden die ja traditionell mit Ricotta. Also vielleicht das nächste Mal vielleicht Sfogliamuffins?
mit Ricotta klingt auch gut – ist eine Überlegung wert :)
Hab letztens auch gesehen, dass jemand Splitterbrötchen in dieser Form gemacht hat – ist ja auch sehr ähnlich.
Wow – ich bin sprachlos, eine absolut geniale Idee und ganz fantastisch umgesetzt. Meinst du, das Rezept klappt auch ohne Hefe? Blätterteig ist ja eigentlich auch in der Regel hefefrei und den vertrage ich ganz gut.
man kanns versuchen ohne Hefe, aber alle Rezepte die ich bisher gesehen hab, waren mit Hefe. Die Verarbeitung der Butter ist ja doch etwas anders als beim Blätterteig – weiss nicht, ob das dann so klappt – ausprobieren! ;)
They are gorgeous!
Thank you Monique! :)
This looks absolutely amazing! I’ll have to try this recipe out. Thank you for sharing this wonderful recipe.
Cruffins are like my dream food! These look absolutely delicious! Great recipe. And I loved your photographs and food styling! :D
Wow. They are gorgeous! Definitely need to try the crofucake too! :)
These look amazing! I’ve been dying to make these. I heard about them from San Francisco.
Thxs! Bit of work at the beginning, but as soon as you manage to control the noodle machine it’s easy ;)))
Great post! I’ve tried a couple of other recipes to make these and haven’t been happy with how they came out. I’m looking forward to trying yours!!
Are you using a 12-muffin standard size pan, or a larger 6-muffin pan for the baking?
Sorry for the late response – I used regular sized muffin tins.
I hope this recipe works better for you i case you try.
I can’t wait to try. Going to get the pasta maker cause now I have multiple uses for it I’m thinking it would very tasty with almond paste as filling or in the layers.
Almond paste in the layers sounds awesome! You should definitely try that!
I am getting ready to attempt this recipe, they look divine! One question before I start, I understand the first 1/4 cup of butter, then you mention to use 1/4 of the remaining butter, but don’t mention what you do with the rest. Thank you! Rebecca
maybe it is not really clearly explained – sorry.
You have the 4 dough portions you roll out with the pasta maker until very thin – on that dough stripe (or stripes if you have to cut it) you spread 1/4 of the butter (not the one for the dough itself) – then you repeat with the next portion of dough and again 1/4 of the butter… and so on :)
Hope that helps!
OMGoodness! These look amazing! I want to make them but have a question first. I am quite good at making flakey, delicious croissant – this dough doesn’t have any laminating does it? It’s just a matter of sheeting the dough very thin and then layering with butter? Does the outer crust act like a croissant when you bite into it? Flakey and crunchy?
the cruffins are flakey and crunchy – not exactly like croissants, but almost :)
Any chance of getting some detailed pictures of the process after the pasta machine?
Sorry, but the pictures from the post are all there are..
First, thank you for posting such a beautiful recipe. I’m sure that anything that pretty has to taste just wonderful. Although I’m an experienced bread baker, I feel a little hesitant about trying it. I must be a visual person, because without pictures, I can’t seem to visualize the process of shaping, from the end of step 3 on. Do you cut the dough in half lengthwise or across? Also, I am unclear about joining the first rolled strip to the second. ….and how does the whole thing become long enough to form it into a knot? Sorry, I don’t mean to sound ignorant, here, but would be grateful for any clarification you can offer me. I really, really really want to make these! Thank you!
you have to cut the strips in half across, so one long strip turns into two shorter ones. You roll up the first one tight, after you added the butter on top and then just place that rolled up dough “log” on the end of the other strip and continue rolling. If you have enough space, just make one very longe strip without cutting it in half and roll up in one step. The log you get at the end has to be cut lengthwise in half, so you can see the layers of dough and butter and then just kind of make a knot. It’s acutally not necessary to have a full knot with two ends sticking out. You just want that kind of shape a bit so it fits into the muffin tins.
Hope that helps :)
Thanks for your reply. With your direction, I actually believe I’ll be able to make these lovely cruffins! I’m sure I’ll be slow at it in the beginning, so as each one is made, it’s probably best to put them (in the muffin tin) in the fridge, so the first ones made, don’t rise too much ahead of the last ones? They’ll be rising in there overnight, anyway……. I guess I’ve answered my own question…… Thank you again for your reply.
Can this be made without a pasta machine if rolled out very thin? How thin does the dough need to be?
you can make it without pasta machine – of course!
Just roll out as thin as you would do with homemade pasta. Very thin. You should be able to read a newspaper laying under the dough ;)
My Cafe: Recipes And Stories Answers for Android
Game Questions & Answers (Q&A) service lets you ask questions about video games for game consoles or PC games. So ask your My Cafe: Recipes And Stories question for Android and get answers from real gamers or answer questions and share your insights and experience with the rest of the gaming community.
Question & Answers
Croissant royale?
How do I make this recipe? Also how do you get a good income of money? I'm always low.
Katiebabs, Jun 9, 2016
Answer from: Mika
For the recipe i am wondering too. As for the money, everytime you increase your level you can up the price of each product. Just pay attention that all prices have dark green color. Also pay attention at the balloons that appear in several products cause you can overprice these products for a limited time though.
Posted on: Jun 11, 2016
Answer from: Maanne
Just my luck, I discovered it. Add chocolate and caramel syrup, whipped cream and hazelnut to croissants. But the hazelnuts should be upgraded :(
Posted on: Jun 11, 2016
Answer from: BlackAngel24
Its actually Chocolate Syrup, Caramel Syrup, Whipped Cream and Hazelnut to Croissant.
Posted on: Jun 15, 2016
Answer from: Nikki
It's Chocolate Syrup, Caramel Syrup, Whipped Cream And Hazelnut and By The Way (btw) you can increase the money using cafe effects like French style and when you level up you can higher ur products
Posted on: Jul 8, 2016
Answer from: Shea123
Chocolate and caramel syrup, whipped cream, and hazelnut to a croissant
Posted on: Jul 13, 2016
Answer from: Gideon
If you going for a style like Paris or London. Use one style and not different styles
Posted on: Jul 18, 2016
Answer from: The Helper
For a good income make speical recipes with spices, you can get spices from phone orders, gifts, custermers or buy them with gems. Once you get the spices you can serve speical recipes which customers will pay up to 3000 coins for, so it is certainly worth it.
Posted on: Aug 9, 2016
Answer from: Monkeys
On my one I get the choice of 2 machines currently the hazelnut machine is either 10k (this will need upgrading 3x) or another machine for 75k! Gonna take a while to save up lol. Love this game
Posted on: Aug 29, 2016
Answer from: Hofy
Hi! The way to earn money is icreasing level so you could increase the prices and unlock recipes and you can increase level by solving the stories by the characters and make money by playing dice and solving quiz and by completing tasks in the festivels
Posted on: Oct 19, 2016

My Cafe: Recipes And Stories - Gameplay Video
- Added on: May 29, 2016

My Cafe: Recipes And Stories - Gameplay Video 2
- Added on: Jun 24, 2016

My Cafe: Recipes And Stories - Gameplay Video 3
- Added on: Jun 24, 2016
If you know game cheat codes, secrets, hints, glitches or other level guides for this game that can help others leveling up, then please Submit your Cheats and share your insights and experience with other gamers.
Croissants vanillés (vanillekipferl)

Ajouter ma photo
Ingrédients
Ustensiles
Ingrédients
Nombre de petits croissants

g d'amande en poudre


g de sucre glace


sachet de sucre vanillé


petite pincée de Sel
Sucre glace pour enrober les petits croissants après la cuisson (facultatif)
ustensiles
 1 pinceau
 1 cuillère en bois
 1 papier cuisson
Préparation imprimer
- Faire légèrement dorer la poudre d'amande dans un poêlon à feu doux (sans beurre ni huile. ).
- Mélanger tous les ingrédients de la pâte et la pétrir. Le beurre doit être ajouté FROID.
- Laisser reposer 2 h.
- Former un quinzaine de petits croissants et les poser sur du papier cuisson. Faire cuire à 200°C pendant 10 à 12 minutes. Ils doivent être très légèrement dorés.
Note de l'auteur
Facultatif : vous pouvez saupoudrer vos croissants de sucre glace. Parfait à déguster avec le thé ou le café!
J'ajoute mon grain de sel
Rédiger un mémo
Choisir un carnet
Pour conserver l'annotation de cette recette, vous devez également la sauver dans votre carnet.
Sauver mon mémo
5 avis sur cette recette
Qu'en avez-vous pensé ?
Donnez votre avis.
Vous ne pouvez pas ajouter de commentaire à cette recette car vous l'avez déjà commentée
Vous ne pouvez pas ajouter de commentaire à cette recette car vous l'avez déjà commentée
Vous ne pouvez pas commenter votre propre recette
Cette recette a reçu
Avec 5 notes et avis
Très bon mais ça n'a pas la forme de croissants ce qui est vraiment dommage car mes amis n'ont pas apprécié. Que ce soit des sables car ils disent que c'est plus des gâteaux que l'on achète au magasin mais moi je trouve que c'est délicieux même comme ça !
Très bon biscuit sablé, je m'attendais à avoir des croissant lol mais pas déçu les biscuit étaient bons.
Mettre au four à forte température et peu de temps, quitte à les sortir pas tout à fait cuits du four, pour qu'ils finissent de cuire à l'air libre (pour garder le croustillant extérieur et le moelleux intérieur). Ajouter des amandes effilées à la poudre d'amande pour ajouter du croustillant aux biscuits et de la vanille liquide pour le moelleux.
C'est plutôt bon, mais le titre est trompeur, c'est plus des sablés que des croissants.
Je n'avais plus de poudre d'amandes, j'ai donc remplacé par de la poudre de noisettes, c'est d'ailleurs à la noisette que sont préparés les vanillekipferl en Allemagne, dans ma région tout du moins. J'ai doublé les proportions avec 150 g de farine et réduit le temps de cuisson à 8 minutes. Je n'avais pas la patience de faire des croissants donc j'ai opté pour des petites boules que j'ai ensuite écrasé avec la paume de la main. Résultat parfait, succès intégral! Merci pour cette recette !
À découvrir aussi
Complétez votre équipement pour cuisiner

Rejoignez la communauté

Devenez testeur !
En panne d'inspiration ?
Voici des suggestions de recette qui pourraient vous intéresser
Mini croissant vanillé
Croissants de lune
Tresse façon croissant aux amandes
Plus de recettes


Ajouter à mes carnets
la recette Croissants vanillés (vanillekipferl)
Choisir un carnet
J'ajoute la recette à mes carnets
Partager à mes amis
la recette Croissants vanillés (vanillekipferl)
Vous confirmez que cette photo n'est pas une photo de cuisine ou ne correspond pas à cette recette ?

Retrouvez Marmiton où que vous soyez en téléchargeant l'application
McDonald's Speisekarte und Zutaten
McDonald's Deutschland
McDonald's Speisekarte und Zutaten Lyrics
Speisekarte
Burger & McNuggets
Hamburger Royal Käse
Hamburger Royal TS®
6er Chicken McNuggets®
9er Chicken McNuggets®
Doppel Royal Cheese
4er Chicken McNuggets®
20er Chicken McNuggets®
McWrap® Thai Curry Chicken
McWrap® Tomate Mozzarella mit Chicken
Pommes Frites (klein/mittel/groß)
Saucen & Dressings
Snack Salat Classic
Snack Salat Chef
Snack Salat Tomate Mozzarella
McSundae® mit Schokosauce
McSundae® mit Karamellsauce
McMuffin® Chicken & Bacon
McMuffin® Bacon & Egg
McMuffin® Sausage & Egg
McMuffin® Sausage TS
McMuffin® Fresh Chicken
Iced Fruit Smoothies & Frappés
Iced Fruit Smoothie Mango Ananas
Iced Fruit Smoothie Erdbeer Banane
Iced Frappé Coffee Choc
Iced Frappé Coffee Caramel
Modifizierte Maisstärke (E1412, E1442)
Mono- und Diglyceride von Speisefettsäuren (E471)
ISELOTTE
FOOD & FASHION & LIFESTYLEBLOG
Tag: croissant breakfast frühstück orangen honig cashews lecker gesund käse

WARMES BUTTERCROISSANT MIT KÄSE, ORANGEN, CASHEWS UND HONIG

Guten Morgen meine Lieben!
Eine neue Woche beginnt, deshalb ist ein gutes Frühstück umso wichtiger!
Da ich vom gestrigen Sonntagsfrühstück noch ein Croissant übrig hatte, habe ich mich heute kurzerhand dazu entschieden, mir etwas leckeres daraus zu zaubern. Croissants sind super, weil sie sowohl süß, als auch herzhaft eine gute Figur machen – diese Version ist eine Mischung aus beidem. Richtig fruchtig erfrischend und durch den Käse dennoch etwas herzhaft. Das nennen ich einen nahrhaften Start!
Viel Spaß beim Nachmachen!

Zutaten (für ein Croissant)
- 1 Buttercroissant
- 1 Scheibe Light Gouda (oder anderer Käse nach Wahl)
- ein Blatt Romana Salat
- etwas Feldsalat
- eine kleine Orange
- ca. 4 Cashewkerne
- etwas Honig
- das Croissant längs halbieren, die untere Hälfte mit dem Käse belegen und beide Hälften bei 180°C für etwa 15 Minuten im Ofen backen
- die Orange schälen und das Fruchtfleisch herausschneiden
- die Cashewkerne klein hacken und in einer Pfanne ohne Öl rösten
- die untere Hälfte des Croissants mit allen übrigen Zutaten belegen, mit Honig beträufeln, mit der oberen Hälfte bedecken und warm genießen

- OUTFIT: BLUMENROCK, ROLLKRAGENPULLOVER & SOCK BOOTS|MEIN GRÖßTER VORSATZ FÜR 2018 9. January 2018
- OUTFIT: CHECKED COAT, KNITTED HOODIE, RIPPED JEANS & STATEMENT BOOTS 4. January 2018
- OUTFIT: FLORAL MAXI DRESS, FAKE FUR COAT & OVERKNEES 28. December 2017
- OUTFIT: TURTLE NECK SWEATER, POLKA DOT DRESS & FLAT OVERKNEES 19. December 2017
- OUTFIT: PINK FAKE FUR COAT, SOCK BOOTS AND MCM BAG 15. December 2017
Like me on Facebook
FOLLOW ME ON INSTAGRAM
There was an error retrieving images from Instagram. An attempt will be remade in a few minutes.
Croissant (Grundrezept)
Getestetes Rezept. Französisches Frühstücksgebäck - sehr lecker, aber auch sehr aufwändig

Zutaten für 12 Portionen
1. Das Mehl in eine Schüssel sieben, mit der Trockenhefe sorgfältig vermischen. Zucker, Salz, Eier, 25g Butter und Milch kalt hinzufügen und zu einem glatten Teig verkneten.
Testberichte zu Croissant (Grundrezept)

Croissant (Grundrezept) wurde außerdem ausprobiert von:
Hast Du dieses Rezept ausprobiert? Hier markieren.
5 Kommentare zu Croissant (Grundrezept)

Das Rezept wurde in 34 Rezeptboxen gespeichert. Liste ansehen
Meld dich an für das Kochmeister-Rezept des Tages
und verpasse nie wieder eine leckere Rezeptidee.
Croissant zutaten

$1 $2 $3 Dollar Menu
$1 $2 $3 Dollar Menu


Extra Value Meal
Extra Value Meal

All Day Breakfast
All Day Breakfast


Buy 1 Get 1 Free
Buy 1 Get 1 Free

Commitment to Quality
Commitment to Quality


Our Food Philosophy
Our Food Philosophy


Our Food Experts
Our Food Experts


See Our Current Deals
See Our Current Deals

Mobile Order & Pay
Mobile Order & Pay

$1 $2 $3 Dollar Menu
$1 $2 $3 Dollar Menu

Mobile Order & Pay
Mobile Order & Pay

The Shamrock Shake is Back
The Shamrock Shake is Back

See What’s Trending Now
See What’s Trending Now


Breakfast from McDonald’s Catering
Breakfast from McDonald’s Catering

NEW Buttermilk Crispy Tenders
NEW Buttermilk Crispy Tenders

NEW Fresh Beef Burgers
NEW Fresh Beef Burgers

NEW Mobile Ordering
NEW Mobile Ordering
NUTRITION CALCULATOR
- <
- <
- <
- <
- Calories From Fat: <
- Saturated Fat: <
- Trans Fat: <
- Cholesterol: <
- Sodium: <
- Dietary Fiber: <
- Sugars: <
- Vitamin A: <
- Vitamin C: <
- Calcium: <
- Iron: <
- Calories From Fat: <
- Saturated Fat: <
- Trans Fat: <
- Cholesterol: <
- Sodium: <
- Dietary Fiber: <
- Sugars: <
- Vitamin A: <
- Vitamin C: <
- Calcium: <
- Iron: <
Select from the categories below


Select an item below to calculate nutrition
Important Note:
At McDonald's, we take great care to serve quality, great-tasting menu items to our customers each and every time they visit our restaurants. We understand that each of our customers has individual needs and considerations when choosing a place to eat or drink outside their home, especially those customers with food allergies. As part of our commitment to you, we provide the most current ingredient information available from our food suppliers for the eight most common allergens as identified by the U.S. Food and Drug Administration (eggs, dairy, wheat, soy, peanuts, tree nuts, fish and shellfish), so that our guests with food allergies can make informed food selections. However, we also want you to know that despite taking precautions, normal kitchen operations may involve some shared cooking and preparation areas, equipment and utensils, and the possibility exists for your food items to come in contact with other food products, including allergens. We encourage our customers with food allergies or special dietary needs to visit www.mcdonalds.com for ingredient information, and to consult their doctor for questions regarding their diet. Due to the individualized nature of food allergies and food sensitivities, customers' physicians may be best positioned to make recommendations for customers with food allergies and special dietary needs. If you have questions about our food, please reach out to us directly at mcdonalds.com/contact or 1- 800-244-6227.
Nutrient contributions from individual components may not equal the total due to federal rounding regulations. Percent Daily Values (DV) and RDIs are based on unrounded values.
The nutrition information on this website is derived from testing conducted in accredited laboratories, published resources, or from information provided from McDonald's suppliers. The nutrition information is based on standard product formulations and serving sizes (including ice for beverages). All nutrition information is based on average values for ingredients from McDonald's suppliers throughout the U.S. and is rounded to meet current U.S. FDA NLEA guidelines. Variation in serving sizes, preparation techniques, product testing and sources of supply, as well as regional and seasonal differences may affect the nutrition values for each product. In addition, product formulations change periodically. You should expect some variation in the nutrient content of the products purchased in our restaurants. Beverage sizes may vary in your market. McDonald’s USA does not certify or claim any of its US menu items as Halal, Kosher or meeting any other religious requirements. We do not promote any of our US menu items as vegetarian, vegan or gluten-free. The natural flavors that we use are derived from animal, plant, dairy or honey sources. Our fried menu items are cooked in a vegetable oil blend with citric acid added as a processing aid and dimethylpolysiloxane to reduce oil splatter when cooking. We are no longer adding TBHQ to our restaurant cooking oil, but as we transition to our new oil supply, some restaurants may have trace amounts of TBHQ in their cooking oil for a period of time. This information is correct as of February 2017, unless stated otherwise.
Are you sure you want to
Are you sure you want to delete all of your items?
Closing the Nutrition Calculator will delete all of your items.
Are you sure you want to leave?
Delete some items to add more items
JOIN OUR EMAIL LIST
Update Your Profile
JOIN OUR EMAIL LIST
Update Your Profile
Careers
Community
Contact Us
Get the McDonald's App
©2017-2018 McDonald's. All Rights Reserved.
©2017-2018 McDonald's. All Rights Reserved.
Leaving McDonald's Web Site
You are leaving the McDonald's Corporation web site for a site that is controlled by a third party, not affiliated with McDonald's. The content and policies, including the privacy policy, on the site you are entering may vary from McDonald's viewpoints and policies. Please be sure to review the policies of every site you visit. McDonald's is not responsible for the opinions, policies, statements or practices of any other companies, such as those that may be expressed in the web site you are entering.
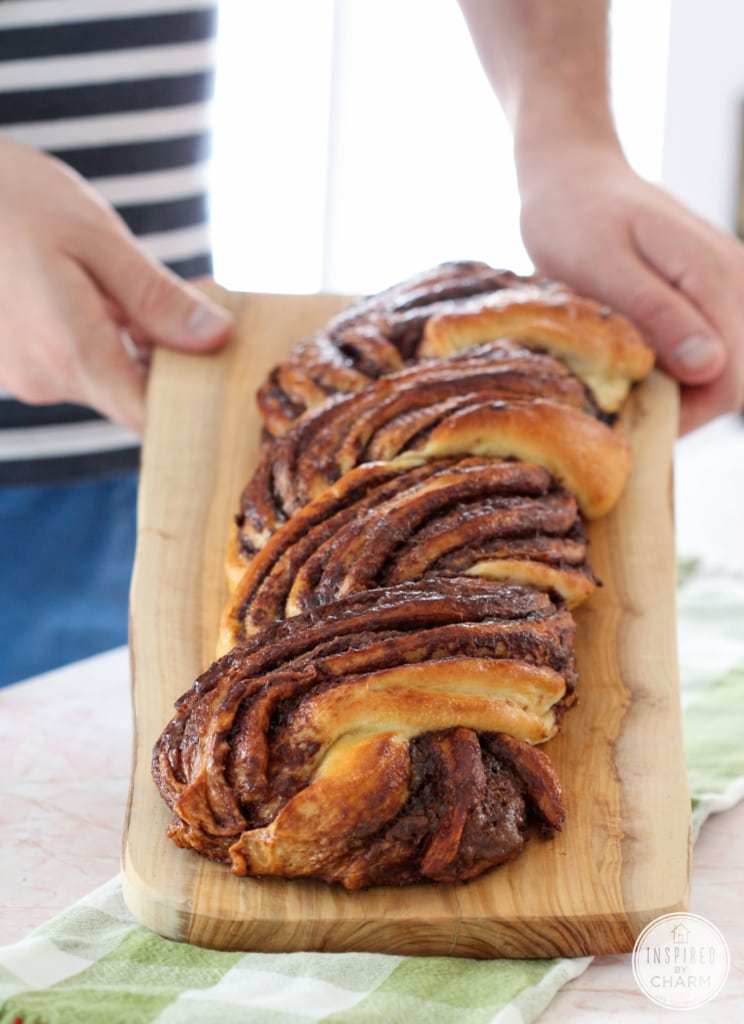
Braided Nutella Bread
We have been experiencing a bit of Indian summer these past couple days here in Central PA. Of course, this is the time I planned to do some baking for the blog. It never fails.
Anyway, today I’m making bread that is slathered with Nutella. You can’t go wrong with that, right?
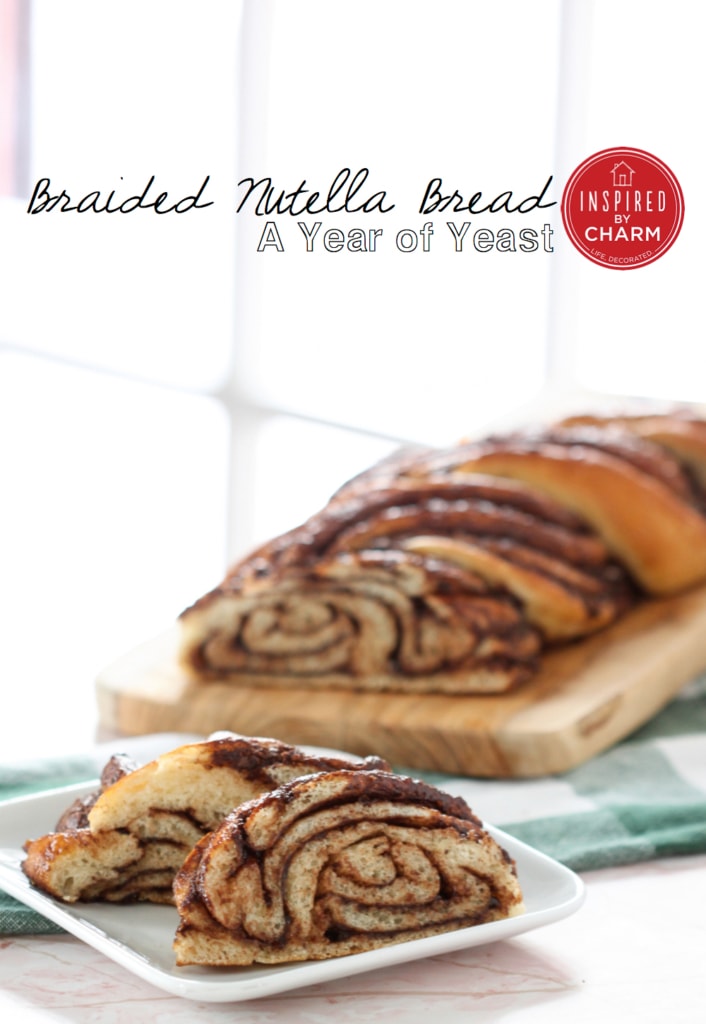
I was doing a little searching on Pinterest and came across this recipe for Braided Nutella Bread from the fabulous Suzanna of Kokocooks. She created this recipe for World Nutella Day. So a big thanks to her for bringing this awesomeness into the world.
I will also tell you that her loaf looks a bit nicer and fluffier than mine. I probably used too much Nutella. Which in my book is really not a problem.
I was excited to try this recipe because of the braiding technique. It’s actually more of a twist, but the effect is still pretty cool.
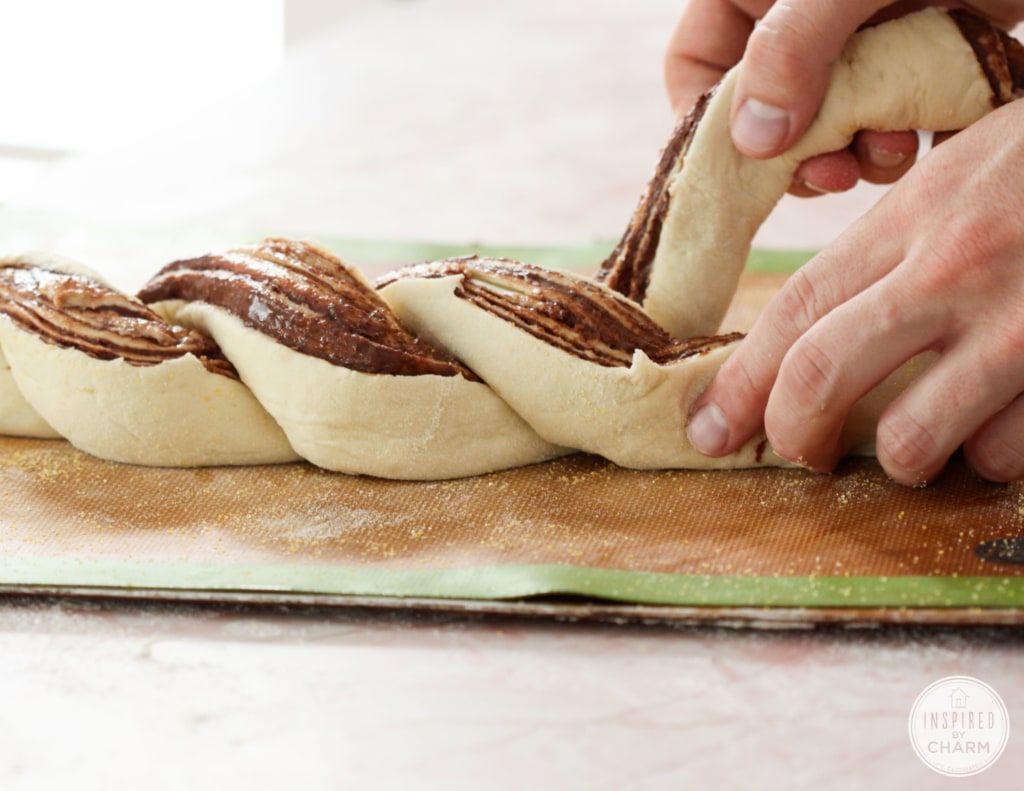
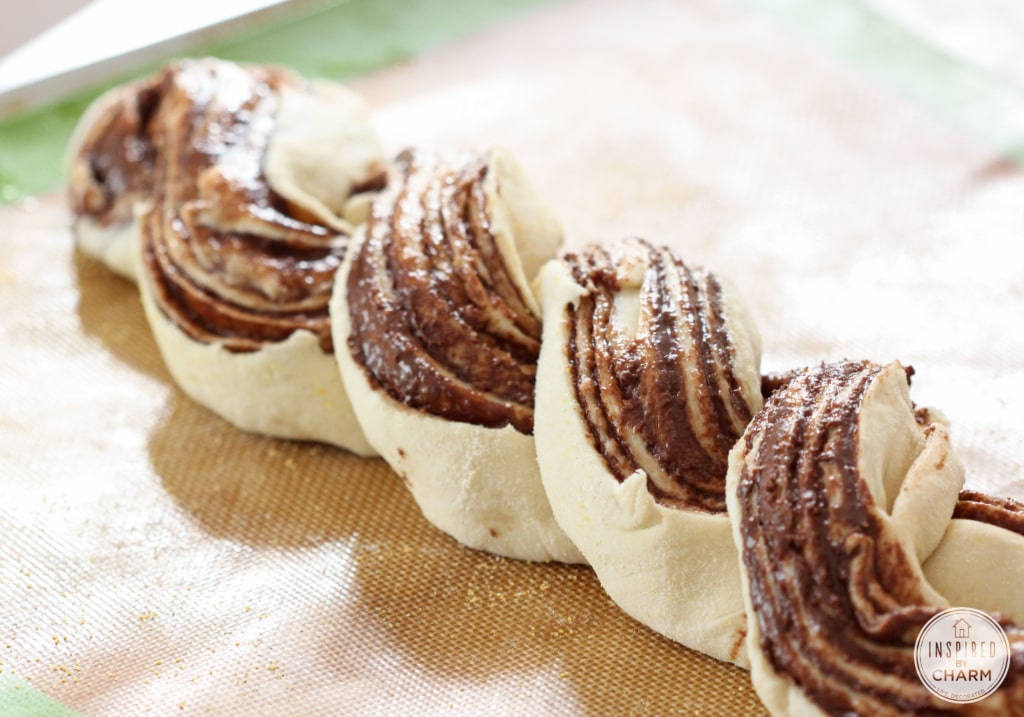
I was a little bit nervous about attempting the braiding, but it was a lot easier than it looked. Clearly I haven’t mastered the technique, but I think it still looks pretty.
Let me show you how this delicious loaf comes together.
Here’s what you will need:
1 cup warm water
1 teaspoon salt
1 tablespoon sugar
Cornmeal for dusting
1 egg, beaten with a tablespoon of water to use as an egg wash
Let’s get baking.
In a small bowl, dissolve yeast in ¼ cup of the water. Let sit for 10 minutes to activate.
Meanwhile, combine flour, salt, and sugar in the bowl of a stand mixer. After add yeast and the remaining water, mix on low with a dough hook attachment. Turn speed up to medium, and knead dough for about 7 minutes.
Place dough in a lightly oiled bowl. Cover bowl loosely with plastic wrap, and then set in a warm place. The dough is ready when doubled in size - about an hour.
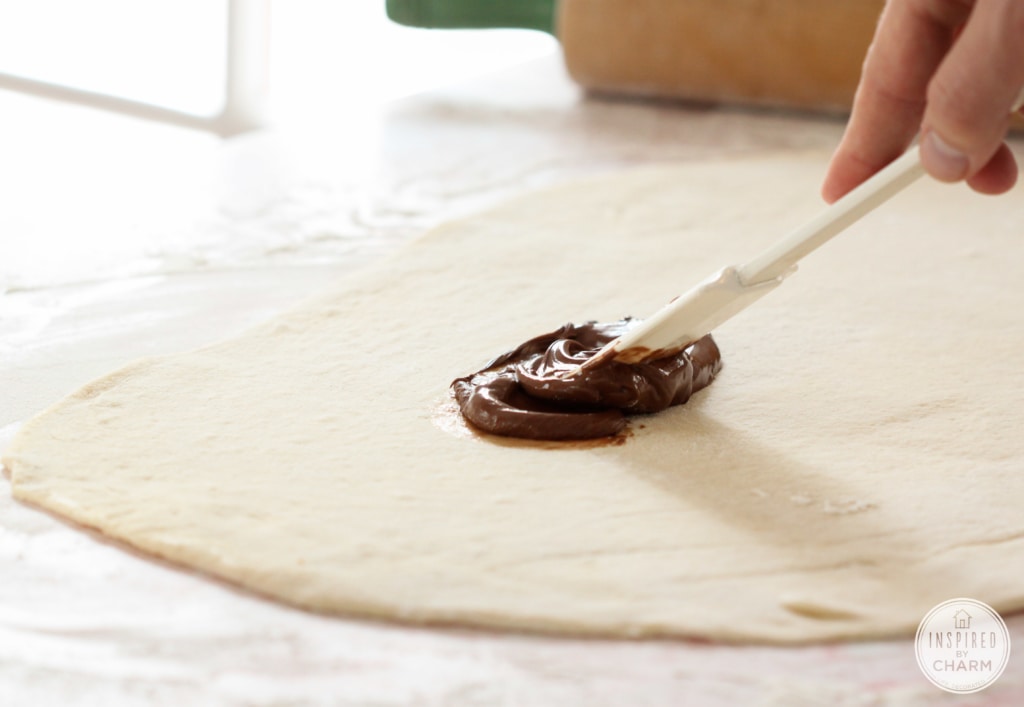
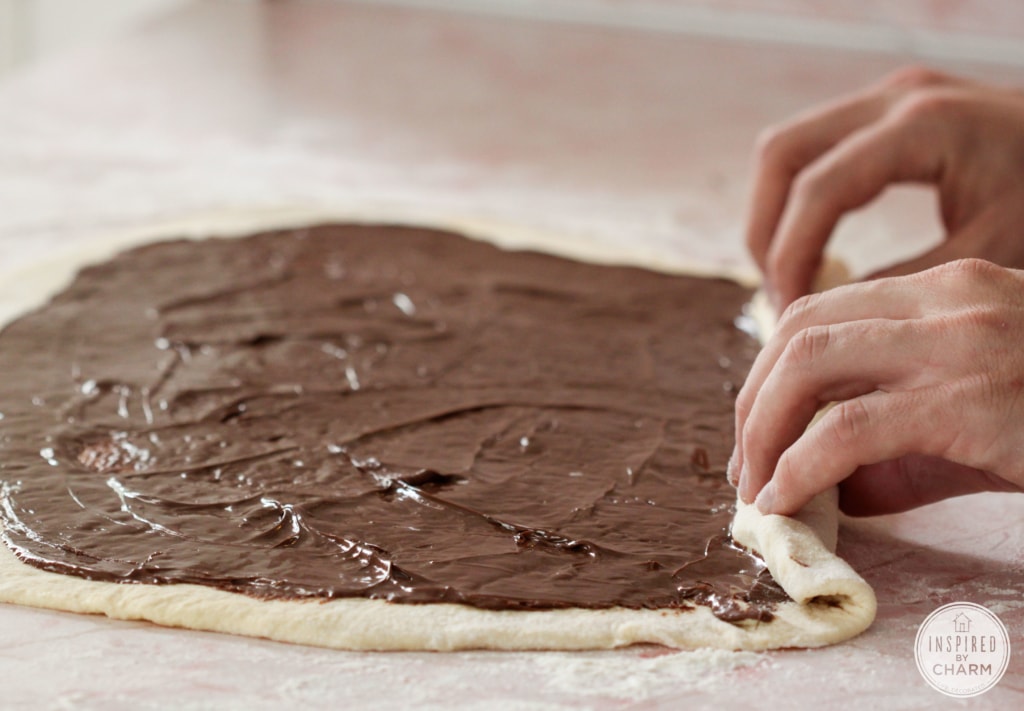
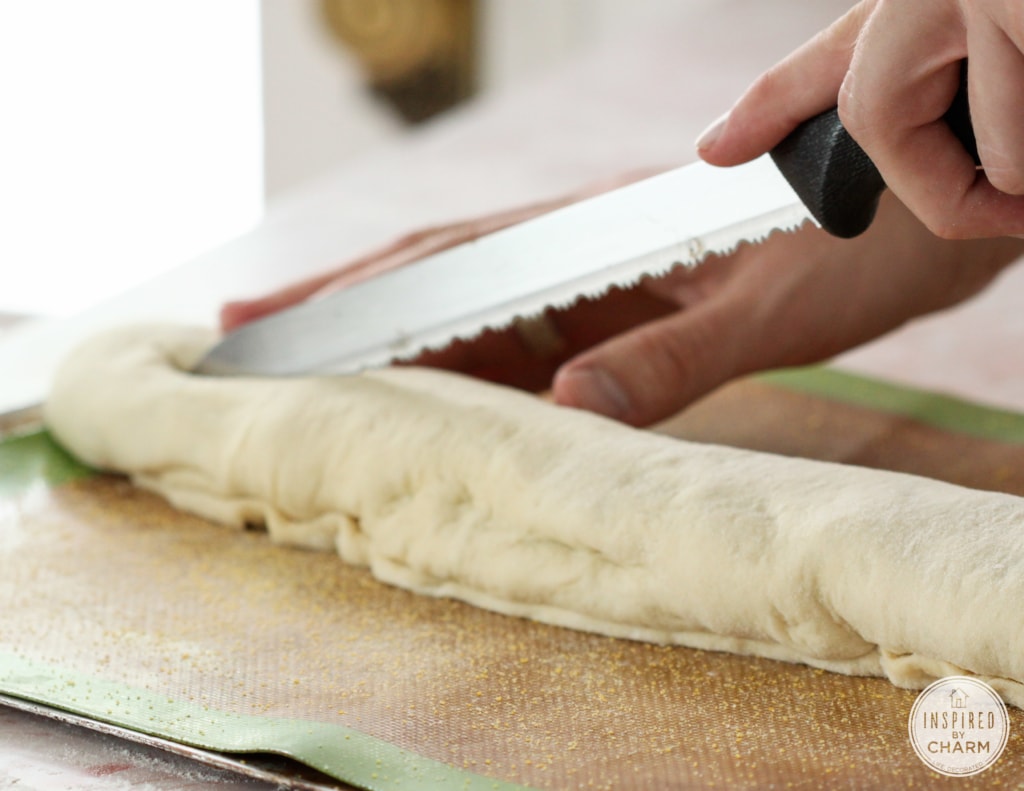
On a lightly floured surface, roll dough to form a rectangle, roughly 12 x 15”. Spread Nutella in an even layer on the surface, leaving a ½ inch border of dough. (I found it helpful to heat the Nutella in a microwave-safe bowl for about 30 seconds. This makes spreading it much easier.) Roll tightly and place on a parchment-lined / silicon-lined baking sheet that’s been sprinkled with cornmeal. Cut the dough down the middle with a knife, leaving one end intact. Twist ends overtop each other, making sure to turn cut side toward the top. Cover dough loosely with plastic wrap and let sit 20 minutes.
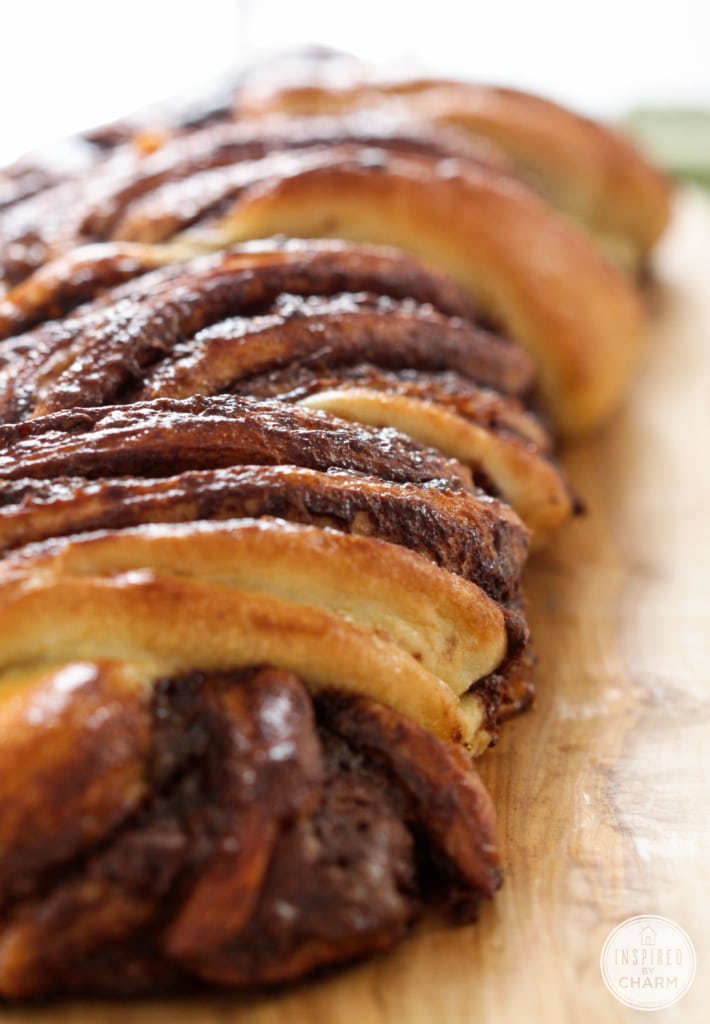
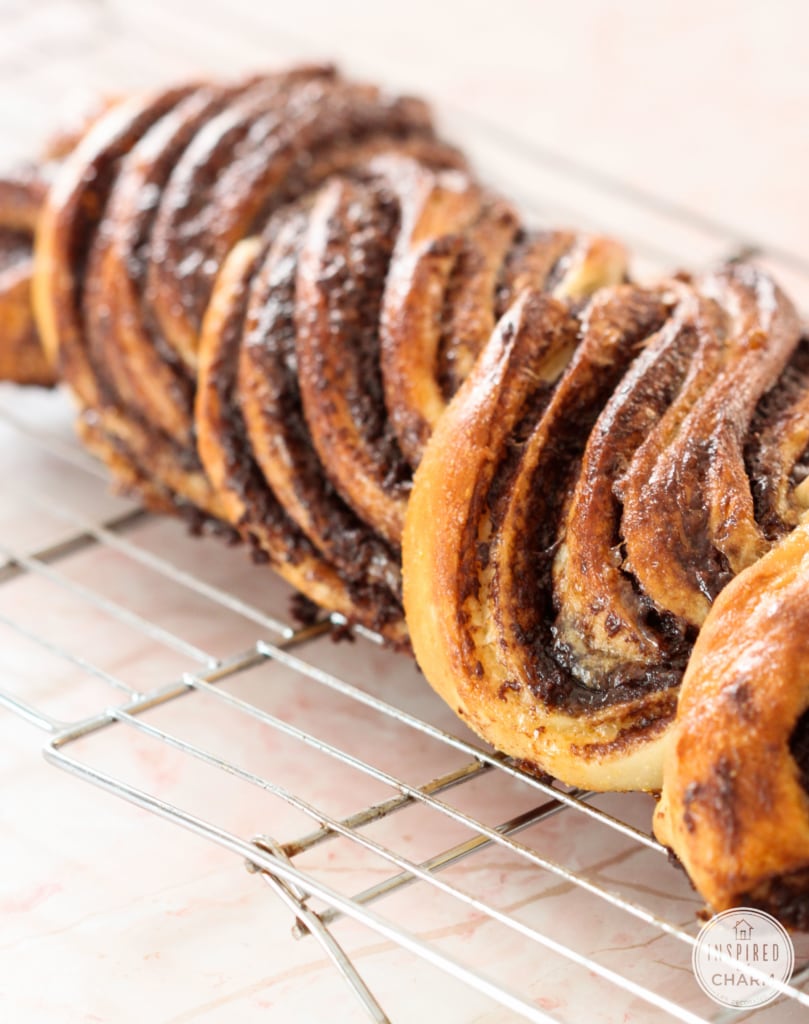
Preheat oven to 350°F. Brush surface of the bread with the egg wash. Bake bread for 20 minutes. Raise temperature to 425°F and bake until lightly browned on top, about 5-7 minutes more.* Remove from oven, and let cool before serving.
*My bread got a little bit darker then I would have liked. Keep a close eye on your bread when you increase the temperature.
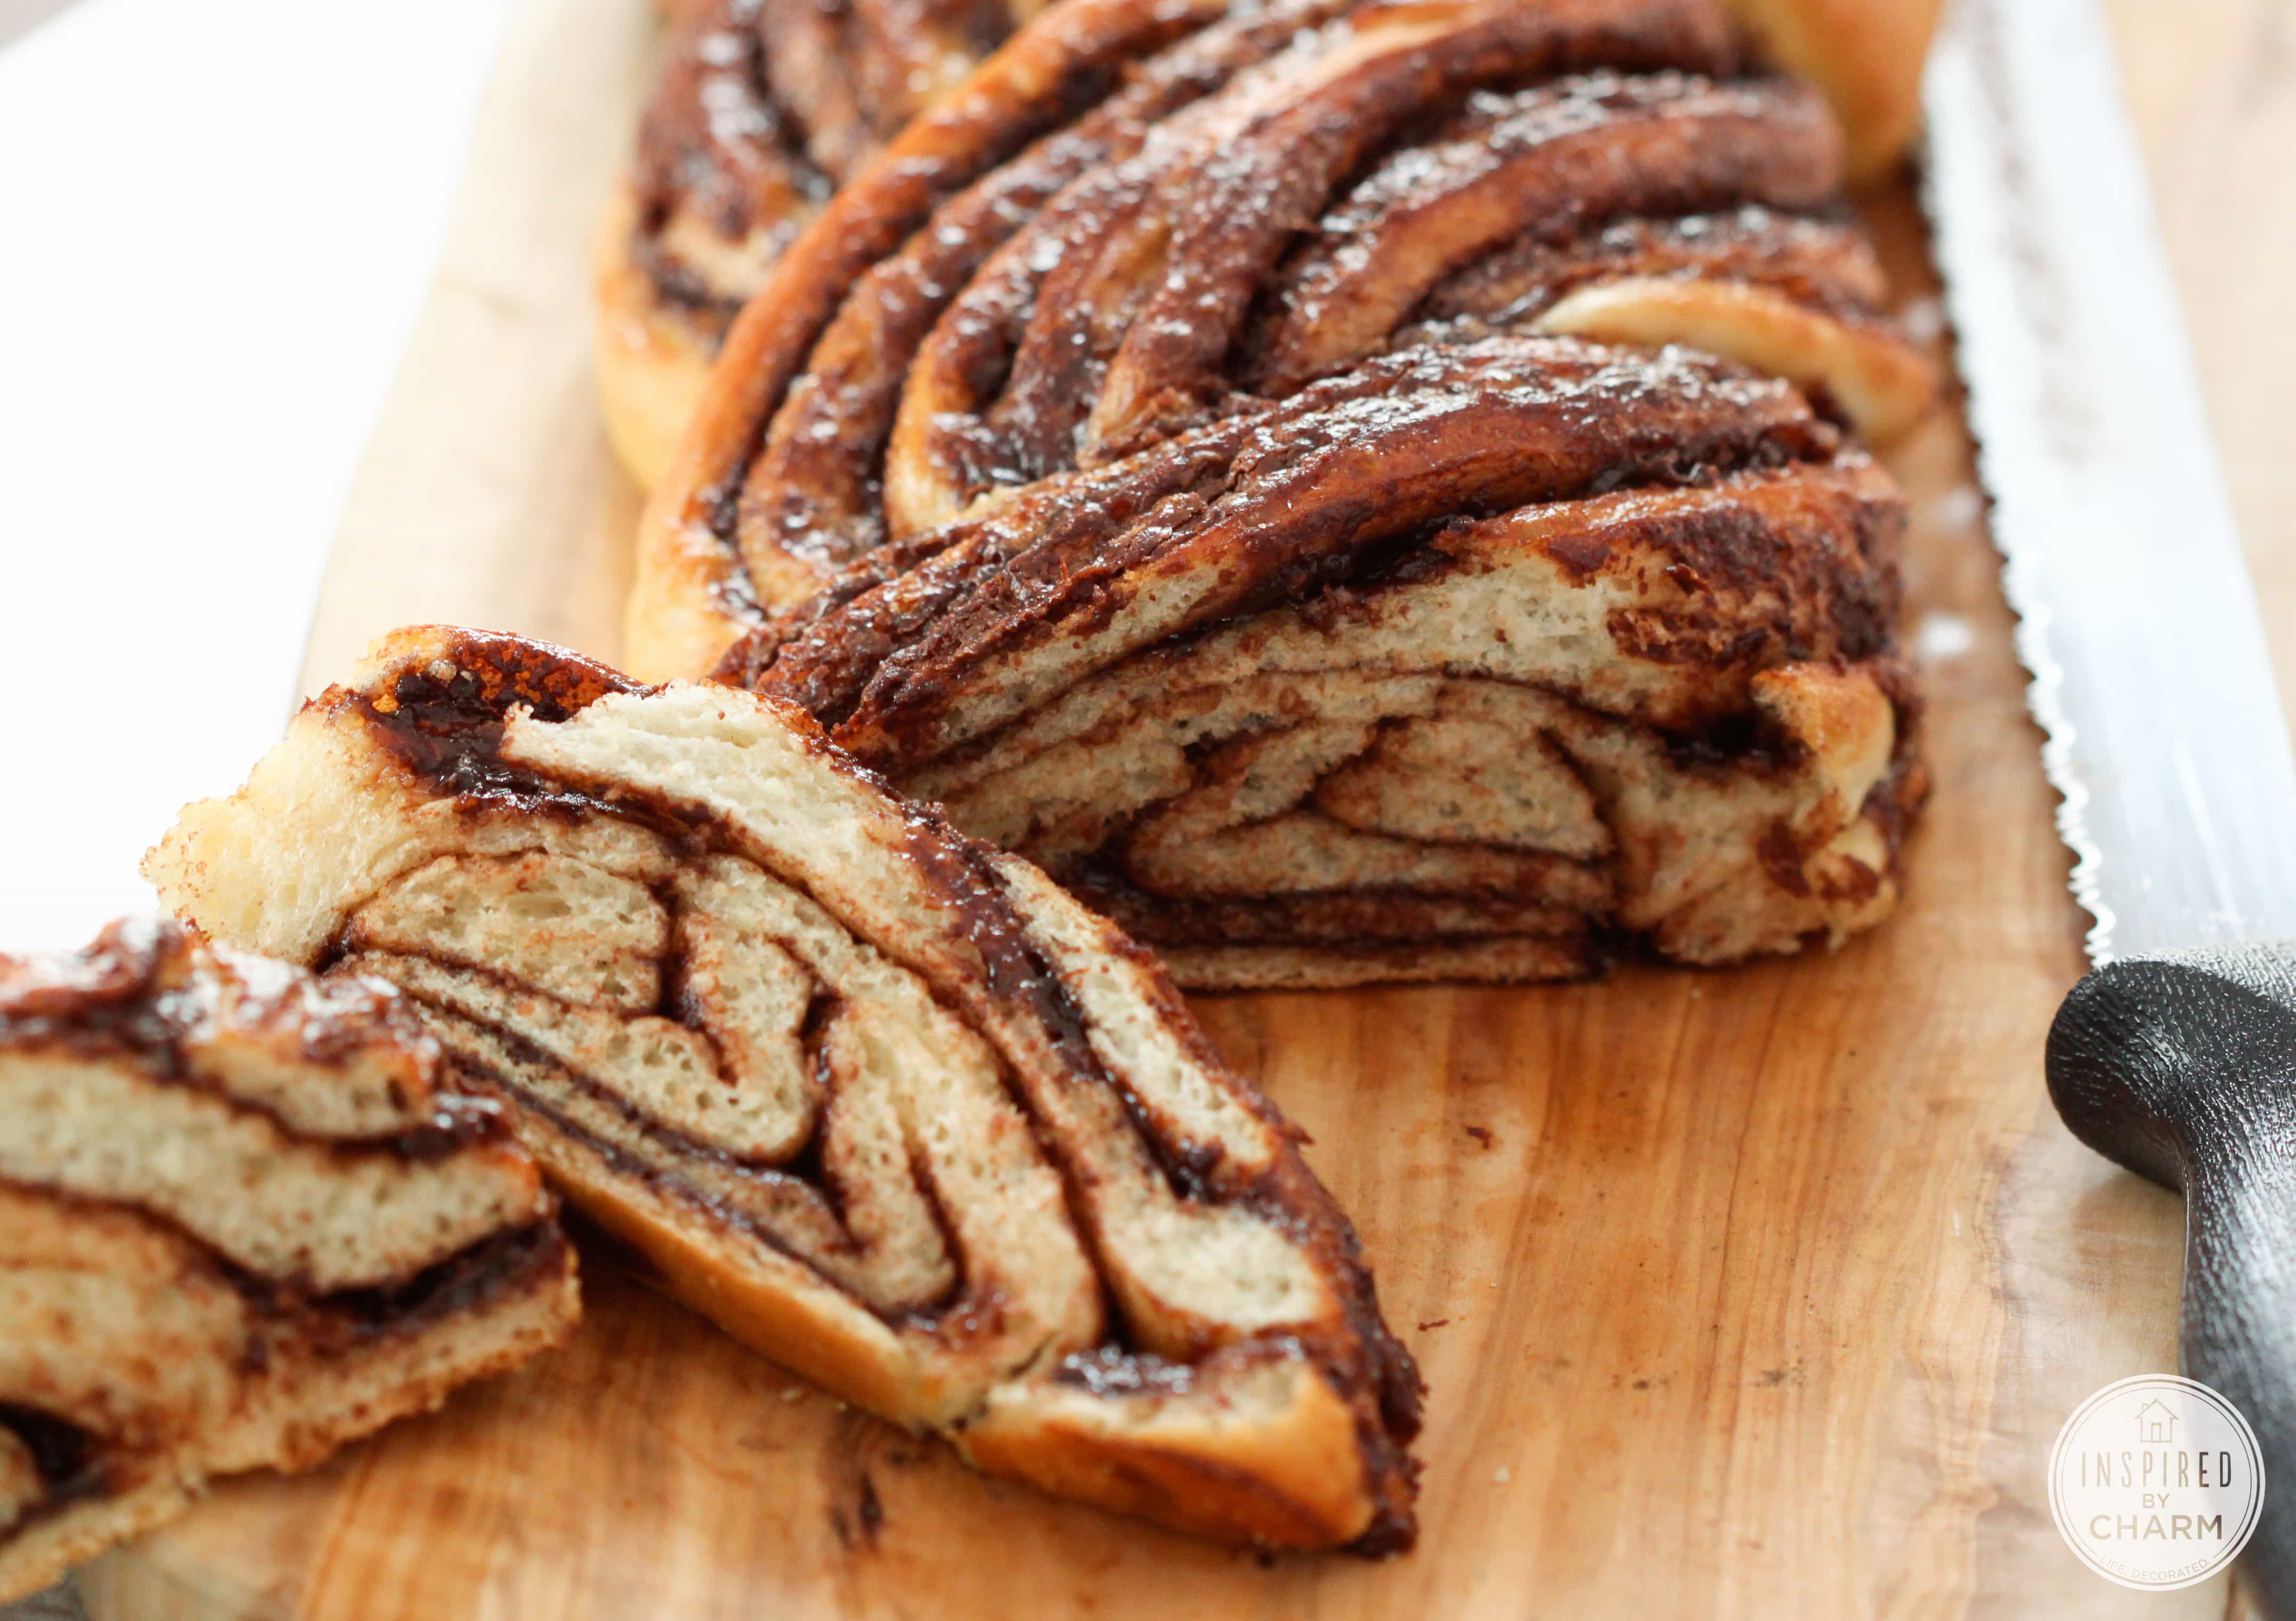
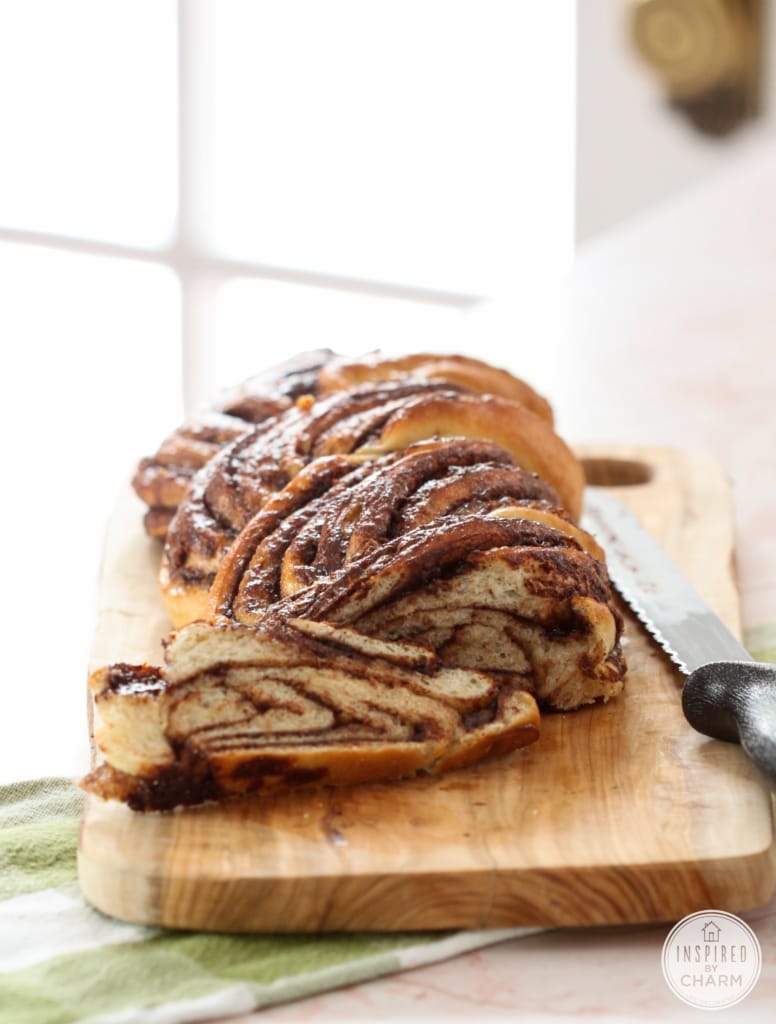
Even though it’s a little dark, it looks pretty sensational, doesn’t it? Let me tell you, it tastes even better than it looks.
I’m pretty certain that Nutella can make almost anything taste great.
Look at all those wonderful swirls of chocolate-hazelnut goodness.

All right, it’s time to enjoy a slice of this with a big glass of cold milk. Thanks again to Kokocooks for the recipe and inspiration. Have a wonderful Wednesday!
Oh, and if you’re looking for an even easier recipe involving Nutella, be sure to check out my Nutella Rolls with Cream Cheese Icing. You won’t believe how simple and delicious they are!

For more A Year of Yeast posts, click here.
Croissant zutaten

Kartoffel-Rösti mit Apfelmus
06.02.2010 Autor: Tim Rubrik: Kuchen & Desserts
Aus der Sendung “Tim Mälzer kocht!” 6.2.2010, 15:30 Uhr, ARD
- Kartoffeln schälen und grob raspeln. Mit Salz, Pfeffer und Muskat würzen und 3-4 Minuten ziehen lassen. Kartoffelmasse gut ausdrücken.
- Schmalz in einer beschichteten Pfanne stark erhitzen, die Kartoffelmasse darin verteilen und fest andrücken. Bei mittlerer Hitze 10-12 Minuten braten. Das Rösti mit Hilfe eines Topfdeckels oder Tellers wenden und in 10-12 Minuten zu Ende braten.
Zubereitung Apfelmus (40 Minuten)
- 1 Stück Zitronenschale dünn abschälen. Zitrone halbieren und den Saft auspressen. Äpfel schälen, vierteln, entkernen und in 1 cm breite Stücke schneiden.
- Apfelstücke mit 3 El Zitronensaft, Weißwein, 4 El Wasser und der Zitronenschale in einem Topf mischen.
- Vanilleschote längs aufschneiden und das Mark herauskratzen. Beides mit Zimt und Zucker zu den Äpfeln geben, aufkochen und die Äpfel zugedeckt bei milder Hitze 15-20 Minuten weich dünsten.
Jede Sendung gibt es ca. 7 Tage nach Ausstrahlung für immer in der VIDEOTHEK.
(Aus: “Tim Mälzer kocht!” ARD, Samstag, 6.2.2010, 15:30 Uhr / mit freundlicher Unterstützung von essen&trinken Für jeden Tag, Fotos: Matthias Haupt )
Huch, keine Kommentare mehr hier? Stimmt. Aber hier geht’s zum Gästebuch.

Комментариев нет:
Отправить комментарий